


Fixtures that attach to the wall are known either as wall lights, sconces, or vanities. Vanities tend to be installed in the bathroom, particularly alongside a mirror. It can be hard to sort through all the different wall lighting fixtures, but here are a few tips.
Sconce Information
Wall Sconces can be attached to the wall of almost any room and can provide task, accent, or general lighting. Wall Sconces Lighting can be particularly useful when the ceiling is very high in a room. Sconce lighting is typically featured on the sides of a mirror, next to a fireplace, or up the sides of a stairwell. Buy sconces and other fixtures from the same lighting collection, for a unified look.
- Wall sconce lighting should be hung at least 5' from the floor.
- In hallways, sconces should be between 8' and 10' apart.
- In stairways, consider a 3-way switch for upstairs and downstairs.
Bathroom / Vanity Information
Designing a lighting plan for your bathroom can be tricky. Utilize different types of lighting fixtures for a layered lighting effect.
- Place bathroom vanity lighting on the sides of the mirror as this ideal cross-illumination eliminates shadows under your eyes and chin.
- They should be mounted about 5' off of the ground and about 36 - 40" apart, if you have the space for it.
- If you can't put vanities on the sides of your mirror, put a vanity light bar on top of the mirror. It should be about 75 - 80" above the floor.
- If you are able to, combine side vanities and top vanity wall lighting for a better layered lighting effect.
- For dual-sink setups, the mirror should be a little bit wider than the over mirror light bar.
- We recommend at least 150 watts of light (incandescent) for the vanity. Consider a dimmer if you are worried about too much light. It is always easier to reduce wattage than increase it on a fixture already installed.
Your Bathroom Options
- Mirrors: Mirrors can make a small room look larger, and increase the impact of anything they reflect.
- Chandeliers: Chandeliers with glass and crystal can multiply and fracture light, creating depth as a central source of lighting.
- Flush Mount: With dimmers, a flush mount light is always a good idea for a small bathroom because it doesn't take up much overhead space.
- Sconces: Alongside mirrors or above the mirror, sconces are available in many sizes from one light to five or more.
- Pendants: Pendants above a bathtub or alongside the mirror are a contemporary option for bathroom lighting.
Layers of Light and Cross Illumination

Layers of light are more effective than one big central light because you can better control the light, depending on the task at hand. To prevent glare and light objects evenly in the room, use multiple sources of light, such as close to the ceiling lights, recessed lighting, cabinet lighting, & wall lighting fixtures. Even layers make it easier to shave or apply makeup in the morning. This effect is created by the perfect amount of wall lighting fixtures and ceiling lighting. Ceiling mounted lighting can still provide ambient lighting that won't glare off of chrome or tile.
Wall sconces can provide task lighting beside a bed, improve facial illumination around a bathroom mirror, brighten a hallway, or draw attention to architectural details in a living room. Yet the same wall light can perform very differently depending on where it is installed.
One of the most common wall lighting mistakes is treating mounting height as a universal measurement. You may frequently see recommendations to install sconces around five or six feet from the floor, but that number does not account for how the room is used. A fixture beside a reading chair needs to direct light toward a seated reader, while a hallway sconce needs to remain comfortable at standing eye level.
The height of a wall sconce, distance between fixtures, light direction, and projection from the wall should all be considered before the junction box is positioned. Even the location of the bulb or integrated LED within the fixture can affect whether the finished installation feels comfortable or creates glare.
This wall sconce placement guide explains how high to hang wall sconces, how far apart to space them, and how placement changes in hallways, living rooms, reading corners, bedrooms, kitchens, bathrooms, and stairways.
What Are Wall Sconces Used For?
Wall sconces are wall-mounted lighting fixtures used for ambient, task, accent, or decorative lighting. Unlike ceiling fixtures, which usually direct light from above, wall lights place illumination closer to eye level and around the perimeter of a room. This makes them useful for filling darker vertical surfaces, supporting specific tasks, and creating additional layers of light.
The purpose of the sconce should be established before deciding where to install it. A decorative wall light framing a fireplace does not need to perform the same job as an adjustable bedside reading sconce. Similarly, a narrow up-and-down light creates a different pattern on a hallway wall than a diffused globe sconce with broader light distribution.
Common Uses for Wall Sconces
- Ambient lighting: Adds softer general illumination around the perimeter of a room.
- Task lighting: Provides more focused light for reading, grooming, or specific work areas.
- Accent lighting: Emphasizes architectural surfaces, artwork groupings, fireplaces, or textured walls.
- Decorative lighting: Adds a visible design element to the wall while contributing to the overall lighting plan.
Expert Note
Choose the purpose of the wall light before choosing its mounting position. The ideal placement for a directional reading light may be uncomfortable for an exposed decorative sconce, even when both fixtures have similar dimensions.
Wall Sconce Placement by Room: Height, Spacing, and Positioning Guidelines
Wall sconces are often installed using a general mounting height, but the same measurement does not work equally well in every room. A hallway is experienced while standing and walking, bedside lighting is used while sitting or reclining, and bathroom vanity lights need to illuminate the face from specific angles. Fixture size, light direction, and nearby architectural features can all change the final position.
As a general starting point, many wall sconces are mounted with the center of the fixture approximately 60 to 72 inches above the finished floor. This range is a reference rather than a fixed rule. Always check where the bulb or brightest part of an integrated LED sits within the fixture, particularly with exposed-light designs.
How High and How Far Apart Should Hallway Wall Sconces Be?
Hallway sconces should provide consistent illumination along the walking path without placing a bright light source directly at standing eye level. Mounting height and spacing work together: the correct height helps control glare, while the distance between fixtures determines whether the hallway develops uncomfortable dark gaps.
Hallway Wall Sconce Placement Guidelines
1. Mount the center of the sconce approximately 60 to 66 inches above the finished floor.
Measure vertically from the finished floor to the center of the installed fixture. This is a practical starting height for residential hallways. If the sconce has an exposed bulb or concentrated LED source near its center, check the light at standing eye level and raise the fixture slightly if direct glare is uncomfortable.
2. Space wall sconces approximately 8 to 10 feet apart.
Measure horizontally from the center of one fixture to the center of the next. This spacing generally works as a starting point for wall lights that distribute ambient light broadly through a residential corridor.
3. Reduce the spacing when the fixture produces a narrow light pattern.
Up-and-down sconces and directional fixtures may create strong illumination immediately around the fixture but leave darker sections farther along the wall. If one light pattern ends before the next begins, position the sconces closer together rather than relying on the standard 8-to-10-foot guideline.
4. Adjust spacing around doors without losing the visual rhythm.
Doorways and architectural openings may prevent perfectly equal center-to-center spacing. Establish the preferred lighting rhythm first, then make small adjustments around openings rather than placing fixtures individually wherever wall space remains.
In narrow hallways, also check the fixture's projection from the wall; deep sconces can extend unnecessarily into the walking path.
For instance, for a 20-foot hallway, broadly diffused sconces spaced approximately 8 to 10 feet apart, center to center, may provide balanced illumination. If the same corridor uses narrow-beam up-and-down lights, closer spacing or additional fixtures may be needed to prevent dark sections between the light patterns.

Where Should Wall Sconces Be Placed in a Living Room?
Living room wall sconces are most effective when their placement relates to the room's architecture or an established focal point. Fireplaces, artwork, built-in cabinetry, and seating arrangements provide stronger positioning references than the center of an empty wall.
Unlike a hallway, a living room is primarily experienced while seated. This means a sconce that appears comfortable from standing height may expose a bright bulb or concentrated LED directly to someone sitting on a sofa across the room.
Living Room Wall Sconce Placement Guidelines:
1. Start with the center of the fixture approximately 60 to 72 inches above the finished floor.
Measure vertically from the finished floor to the center of the sconce. The wider range accounts for differences in ceiling height and fixture size. With tall vertical sconces, also identify the position of the actual light source rather than relying only on the fixture's center point.
2. Check the fixture from the main seated positions in the room.
Sit on the sofa and principal chairs before finalizing the junction box height. If an exposed bulb or bright LED is directly within the seated sightline, adjust the mounting height or choose a fixture with a diffuser or shade.
3. Position sconces in relation to a visual anchor.
Use the fireplace, artwork, console, built-in shelving, or seating arrangement to establish the fixture location. For a fireplace, use the mantel line as a visual reference rather than an automatic centerline. With taller vertical sconces, the lower portion of the fixture may align with or begin near the mantel while the pair frames the mirror, artwork, or television above. For artwork, confirm the final frame size and position first, then leave enough wall space between the frame and each fixture to avoid crowding. If the artwork sits above a console or credenza, treat the furniture, artwork, and sconces as one complete grouping.
4. Match the fixture's light direction to the lighting effect you want to create.
Wall sconces can create different lighting effects depending on how they distribute light. Wall washing spreads light broadly and evenly across a surface, while wall grazing emphasizes stone, brick, plaster, and other textured walls through highlights and shadows. Uplights direct light toward the ceiling, downlights focus illumination below, and diffused sconces provide broader ambient lighting. Consider the intended effect when planning fixture placement and spacing.
5. Use wall sconces as part of the room's layered lighting plan.
If a chandelier, ceiling light, or recessed lighting already provides strong general illumination, the wall sconces do not need to duplicate that output. They can provide a softer layer of ambient light or emphasize architectural features. Use dimmers when the sconces serve both ambient and decorative purposes.
In a living room with a central chandelier and dark perimeter walls, broadly diffused sconces can add illumination around the edges of the room. Mount the fixture centers within the 60-to-72-inch starting range, then check the actual light source from the sofa before finalizing the height.

Where Should a Wall Sconce Be Placed for a Reading Corner?
A reading sconce should direct useful light toward the page rather than simply brighten the wall around the chair. Decorative wall lights with upward-facing or heavily diffused shades may create comfortable ambient light but still leave a book underlit.
For this reason, reading-light placement should begin with the reader seated in the actual chair and holding a book at a normal reading height.
Reading Wall Sconce Placement Guidelines:
1. Start with the sconce approximately 48 to 60 inches above the finished floor.
Measure to the center of the fixture as an initial reference. Chair height and fixture design can change this position, so the final height should always be tested while seated.
2. Position the fixture beside or slightly behind the reader.
The light should reach the book from an angle without shining directly into the reader's eyes. Avoid placing the fixture directly behind the head, where the reader may block the light and cast a shadow across the page.
3. Place the light opposite the reader's dominant hand when possible.
For a right-handed reader, light approaching from the left can reduce shadows from the hand and arm. A left-handed reader may benefit from light approaching from the right.
4. Choose directional or adjustable sconces for dedicated reading light.
Swing-arm and pivoting fixtures allow the light source to move closer to the book. Adjustable reach can provide better task lighting than simply increasing the fixture's brightness.
5. Check the position of the bulb or LED from the seated sightline.
The light source should remain outside the reader's direct field of view. If an exposed bulb is visible while reading, adjust the mounting height or choose a fixture with a shade or diffuser.
Example
For an upright reading chair, begin with the fixture center approximately 48 to 60 inches above the floor and slightly beside the reader. Sit in the chair with a book and confirm that the head and shoulder do not interrupt the light path before fixing the junction box position.

How High Should Bedside Wall Sconces Be?
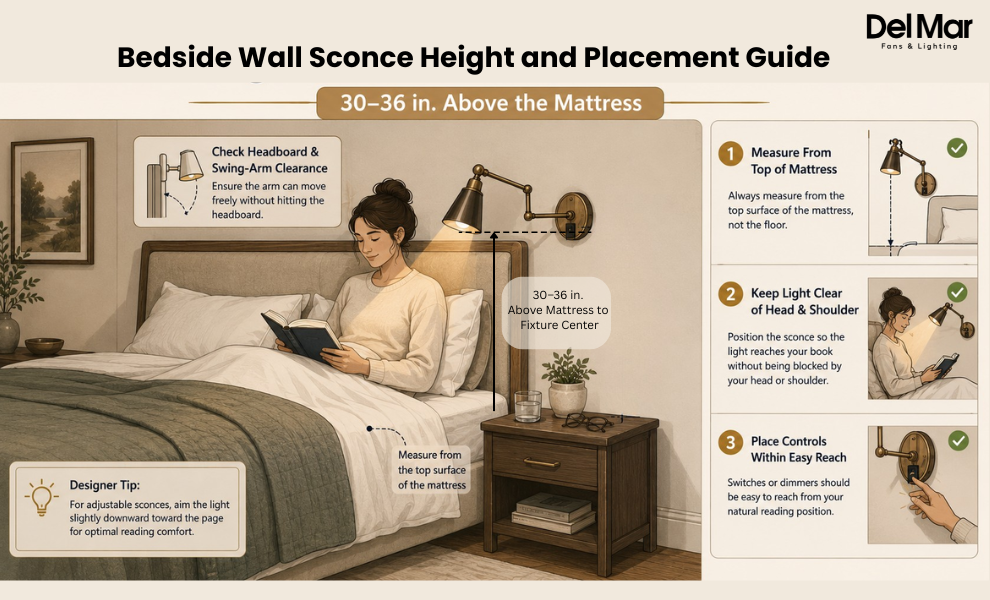
Bedside wall sconces need to provide useful light while remaining easy to operate from bed. Standard floor-based mounting measurements are less reliable in bedrooms because mattress thickness, bed-frame height, and headboard dimensions vary considerably.
For bedside placement, use the top of the mattress and the user's seated reading position as the primary references.
Bedside Wall Sconce Placement Guidelines:
1. Start approximately 30 to 36 inches above the top of the mattress.
Measure vertically from the top surface of the mattress to the center of the fixture. Use this range as a starting point, then check the light while sitting against the pillows.
2. Position the sconce so the user's head and shoulder do not block the light.
A fixture placed directly behind the sleeper may cast a shadow onto the book. Move the sconce slightly outward or use an adjustable arm when the wall sconce is intended to serve as a bedside reading light.
3. Check headboard clearance.
Measure the full height and width of the headboard before locating the fixture. Swing-arm sconces also require enough clearance to extend and pivot without contacting upholstered or decorative headboards.
4. Keep switches and integrated controls within comfortable reach.
Sit or recline in bed and confirm that the fixture can be operated without stretching across the nightstand. This is particularly important when the wall light replaces a bedside table lamp.
5. Position paired sconces in relation to the bed, not the entire wall.
Measure an equal horizontal distance from each side of the bed or headboard. This usually creates better visual balance than centering the sconces within the total wall width.
Example
If the top of the mattress is 26 inches above the floor, begin by positioning the sconce center approximately 30 to 36 inches above the mattress, or roughly 56 to 62 inches above the finished floor. Test the position while seated in bed before confirming the installation height.
Where Should Wall Sconces Be Placed in a Kitchen?
Kitchen wall sconces can provide task, accent, or architectural lighting, but their placement must account for cabinetry, shelving, shadows, and reflective surfaces. A fixture that appears correctly positioned on an empty wall may perform differently once someone stands at the counter or opens an upper cabinet door.
Before choosing a mounting location, determine whether the sconce needs to illuminate a work surface or provide a secondary layer of light.
Kitchen Wall Sconce Placement Guidelines:
1. Identify the surface or architectural feature the sconce is intended to light.
For task lighting, establish the exact counter, sink, or preparation area first. For decorative lighting, use windows, open shelves, or cabinetry as the primary placement references.
2. Check shelf depth when placing sconces above open shelving.
Deep shelves can block downward-directed light. Compare the fixture's projection and beam direction with the shelf depth to confirm that light reaches the intended surface rather than illuminating only the top shelf.
3. Position paired sconces around kitchen windows in relation to the window frame.
Confirm the final window trim and cabinet dimensions first. Measure outward from the window so both fixtures maintain a consistent relationship to the frame rather than centering each sconce within the remaining wall area.
4. Verify cabinet-door and fixture clearance.
Compare the sconce's full projection with the movement of nearby cabinet doors. Swing-arm fixtures should be checked at their maximum extension, not only in the closed position.
5. Verify the fixture's location rating where moisture exposure is a concern.
For wall lights installed near sinks or other moisture-prone areas, review the manufacturer's location rating and installation instructions and follow applicable electrical requirements.
For paired sconces around a kitchen sink window, confirm the window trim, adjacent cabinet widths, and fixture projection first. Position the sconces at equal distances from the window frame and verify that cabinet doors can open fully without contacting the shades.

How Should Bathroom Vanity Lights Be Placed?
Bathroom vanity lighting should illuminate the face evenly for everyday tasks such as shaving, applying makeup, and grooming. The most common mistake is relying on a single bright fixture above the mirror. Although this can make the bathroom appear well lit, light coming primarily from above often creates shadows beneath the eyes, nose, and chin.
A better vanity lighting plan considers where the light reaches the face, not simply how bright the bathroom feels. When space allows, fixtures on either side of the mirror provide balanced cross-illumination. Over-mirror lighting can then be used when side placement is not practical or as an additional layer of light in larger bathrooms.
Bathroom Vanity Lighting Placement Guidelines:
1. Place vanity lights on both sides of the mirror for the most even facial lighting.
Side-mounted wall lights illuminate the face from two directions, helping reduce the shadows commonly created by overhead lighting. This arrangement is particularly useful at primary bathroom vanities where grooming and makeup application require clear, balanced light.
2. Mount side vanity lights approximately 60 to 66 inches above the finished floor.
Measure from the finished floor to the center of each fixture. Adjust the height based on the primary users and the sconce design so the light source sits near face level rather than significantly above the head.
3. Space side-mounted vanity lights approximately 36 to 40 inches apart when space allows.
Measure horizontally from the center of one fixture to the center of the other. Mirror width and fixture dimensions may require adjustment, but the goal is to position light on both sides of the face.
4. If side lighting is not possible, install a bathroom vanity light above the mirror.
As a starting point, mount the fixture approximately 75 to 80 inches above the finished floor. Confirm that the light is centered with the mirror and has adequate clearance above the frame.
5. Size an over-mirror light in proportion to the mirror and vanity.
Avoid a light bar that visually overwhelms the mirror or extends awkwardly beyond its edges. For wider double vanities, a longer fixture or multiple coordinated lights can provide more even coverage.
6. Combine side and over-mirror lighting when more complete illumination is needed.
Side sconces can provide balanced facial light while an overhead vanity fixture adds another layer of illumination. Dimmers allow the fixtures to work together without making the vanity unnecessarily bright at all times.
7. Compare lumens and CRI rather than relying on incandescent wattage recommendations.
Lumens indicate light output, while CRI, or Color Rendering Index, affects how accurately colors and skin tones appear. For grooming and makeup application, consider lighting with a CRI of 90 or higher.
8. Use dimmers to adjust vanity lighting throughout the day.
Bright task lighting is useful for detailed grooming but may be uncomfortable during late-night use. Dimming allows the same vanity fixtures to support different routines.
For example, for a single vanity with adequate wall space beside the mirror, begin with two sconces mounted 60 to 66 inches above the floor to the fixture center and approximately 36 to 40 inches apart, center to center. Adjust the spacing to the mirror width and confirm that both light sources illuminate the face evenly.

How High and How Far Apart Should Stairway Wall Sconces Be?
Stairway sconce placement is different from hallway lighting because both the walking surface and the viewer's eye level change as someone moves up or down the stairs. Measuring every fixture from the floor at the bottom of the staircase can leave upper sconces incorrectly positioned.
Instead, each fixture should maintain a consistent relationship with the corresponding stair tread or walking surface below it.
Stairway Wall Sconce Placement Guidelines:
1. Mount the center of each sconce approximately 60 to 66 inches above the corresponding stair tread.
Measure vertically from the tread or walking surface directly below the fixture to the center of the installed sconce. Do not use the ground-floor level as the reference for every light.
2. Allow multiple sconces to follow the rise of the staircase.
Each fixture should maintain a similar vertical relationship to the stairs. When viewed together, the sconces will naturally form a line that responds to the staircase slope.
3. Determine spacing according to light distribution and staircase geometry.
A straight staircase may support a regular fixture rhythm. Landings, turns, and changes in wall direction can interrupt the light pattern and may require adjusted spacing or an additional fixture.
4. Check glare while walking in both directions.
A bulb that is shielded while ascending may become directly visible when approaching the same fixture from above. Walk the staircase up and down and check each light from the changing eye level.
5. Pay particular attention to landings.
Landings are functional walking areas and can develop dark sections between sconces positioned along separate stair runs. Evaluate the illumination on the landing independently.
6. Check fixture projection on narrow stairways.
Measure from the wall to the outermost point of the installed sconce. Low-profile fixtures are often more practical where the walking path passes close to the wall.
On a straight staircase, mark each proposed fixture approximately 60 to 66 inches above its corresponding tread. Once the heights are established, review the spacing between the light patterns and walk the stairs in both directions to check for glare and dark sections.

How Do You Choose the Right Wall Sconce for the Placement?
Correct placement cannot completely compensate for a wall sconce that is poorly suited to the location. Before installation, compare the fixture's dimensions and light distribution with the way the room will actually be used.
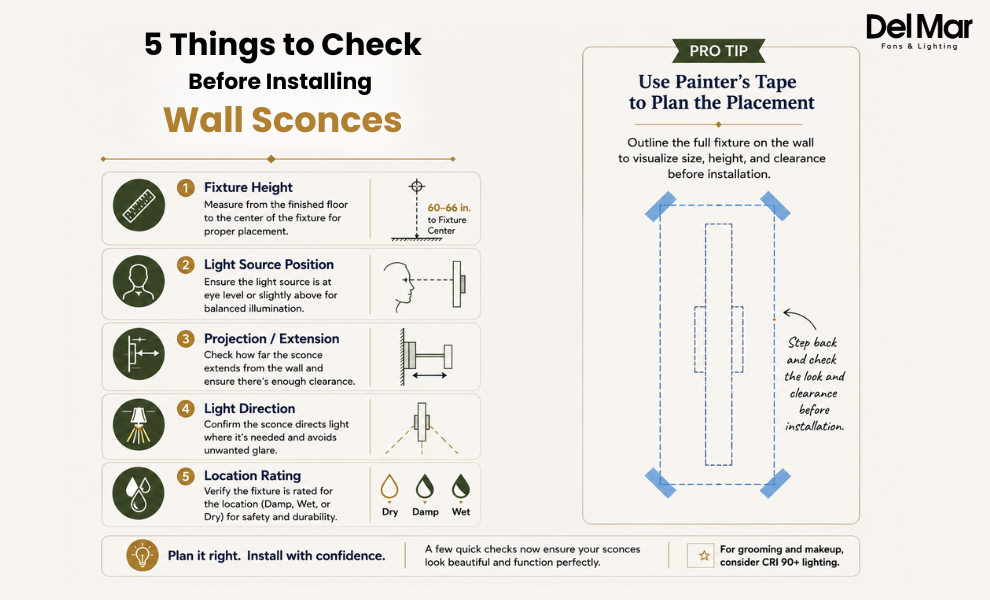
1. Check the Fixture's Height and Light Source Position
Two sconces can share the same junction box height and still place their light sources at very different levels. A tall vertical fixture may position the integrated LED above and below the box, while a compact exposed-bulb sconce may place the brightest point directly at the box center.
Review the full fixture dimensions and identify where the actual light source sits before marking the wall.
2. Check Fixture Projection
Projection, sometimes listed as extension, is the distance the installed fixture extends from the wall. This measurement is especially important in hallways, stairways, beside beds, and around kitchen cabinetry, where a deep fixture may interfere with circulation or nearby furnishings.
3. Consider Light Distribution
A broadly diffused wall light can contribute ambient illumination across a larger area. Directional, up-and-down, and narrow-beam fixtures create more concentrated patterns and may require different spacing.
The amount of light a fixture produces matters, but lumens alone do not describe where that light will go.
4. Consider Dimming and Integrated Controls
Dimming can make wall lights more adaptable when the same fixture provides brighter task lighting and softer ambient lighting at different times. For bedside or reading applications, also consider whether switches and integrated controls remain easy to reach from the normal seated or reclining position.
5. Verify the Location Rating
Use fixtures rated for the conditions in which they will be installed. Bathrooms, sink areas, and other moisture-prone locations may have different requirements from dry living rooms or bedrooms. Always review the manufacturer's installation instructions and applicable electrical requirements.
Plan Wall Sconce Placement Around the Room, Not a Single Rule
The familiar 60-to-72-inch wall sconce height is a useful starting point, but good wall lighting placement depends on where and how the light will be experienced. A hallway sconce must remain comfortable at standing eye level, a reading light needs to reach the page from a seated position, and bathroom vanity lighting should illuminate the face evenly rather than simply make the room brighter.
Before installation, consider the fixture's full dimensions, projection, and light direction alongside the room's furniture and architectural features. A fireplace mantel, artwork grouping, headboard, kitchen window, or staircase can provide a more useful placement reference than the center of an empty wall. The position of the bulb or integrated LED also matters, particularly with exposed-light fixtures where glare can become noticeable.
Whenever possible, choose the wall sconce before electrical rough-in and mark its actual size on the wall. Then view the proposed position from where the light will be used—walk through the hallway, sit on the sofa, read in the chair, or lean against the pillows in bed. The best wall sconce placement combines practical measurements with the way people actually move through and use the room.
FAQ: Wall Sconce Placement and Height
Q. How high should wall sconces be mounted?
A. Many residential wall sconces are mounted with the center of the fixture approximately 60 to 72 inches above the finished floor. The ideal height varies by room, fixture size, and the position of the light source. Bedside and reading sconces should also be evaluated from a seated position.
Q. How far apart should wall sconces be?
A. In hallways, 8 to 10 feet apart, center to center, is a common starting point. Sconces with narrow or directional light patterns may require closer spacing, while broadly diffused fixtures may distribute illumination across a larger area.
Q. Should wall sconces be at eye level?
A. Not necessarily. An exposed bulb or concentrated LED placed directly at eye level can create glare. Use eye level as a visual check rather than a mounting rule, and consider whether the room is primarily experienced while standing or sitting.
Q. How high should bedside sconces be above a mattress?
A. As a starting point, position the center of a bedside wall approximately 30 to 36 inches above the top of the mattress. Adjust the final height based on the headboard, seated reading position, and direction of the light.
Q. How high should bathroom vanity sconces be?
A. Side-mounted bathroom vanity sconces commonly begin around 60 to 66 inches above the finished floor to the fixture center. When space allows, positioning lights on both sides of the mirror can provide more even facial illumination.
Q. Should wall sconces point up or down?
A. It depends on the intended lighting effect. Uplights direct illumination toward the ceiling, downlights focus light below the fixture, and diffused sconces provide broader ambient lighting. Wall washing can create more even surface illumination, while wall grazing emphasizes textured surfaces through highlights and shadows.
Related Resources:
2. Understandiing Layered Lighting
3. How to Choose Right Lighting for every Room
Updated on August 1, 2026.
